What’s the best way to make crystal snowflakes? Try this crafty winter science experiment for kids.

Making crystal snowflakes seems to be the ‘classic’ Borax crystal science project. I’ve seen it in a bunch of places (like here, here, here, and here), but everyone seems to do it slightly differently. Some leave their snowflakes white. Some use coloured pipe cleaners. Some add food colouring to the solution. (And I’d heard of a fourth technique used to make crystal rocks, which I was super keen to try out with snowflakes to see if it worked!)
So, being a science family, we decided to do a little comparison experiment at home, to see which technique yielded the best looking crystal snowflakes.
Suitable for
Generally I’d recommend this activity for primary (elementary) aged kids (ie 7-9 year olds). Younger kids (5-6 year olds) may like to try it too, with assistance. My kids first made Borax crystals when they were 4 year olds, BUT they fully understood the need to take safety precautions and not put any Borax in their mouth. Please see safety notes at the bottom of this post when judging if this activity is right for your child.
Four ways to make crystal snowflakes
We used:
- 6mm furry pipe cleaners in white and navy blue (also called chenille stems)
- invisible nylon thread and scissors
- Borax powder
- 4 wide mouth jars (or, more accurately, we used 3 jars and 1 tumbler – as I didn’t have a 4th matching jar…)
- boiling water
- spoons for stirring
- pencils or chopsticks for balancing on top
- paper (optional)
- safety glasses (optional, but recommended. We have these ones.)
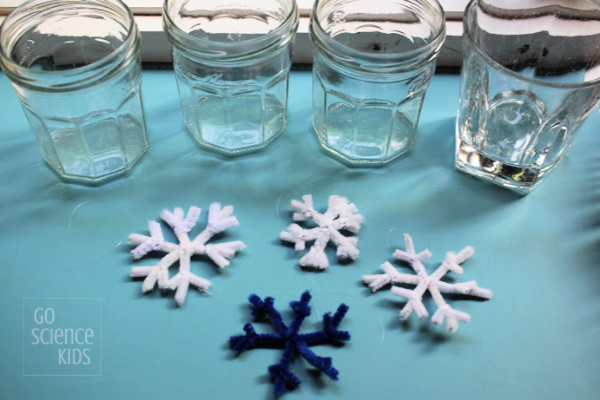

1. Create pipe cleaner snowflakes by cutting and twisting the pipe cleaners. We used about 1.5 pipe cleaners per snowflake. Please bear in mind that snowflakes are always six-sided. Your snowflakes also need to be small and narrow enough to be able to easy dangle inside your containers, without touching the sides or bottom. We made 3 x white and 1 x blue snowflake.
2. Tie on a loop of nylon thread to one of the snowflake arms of each snowflake. This will be used to dangle the snowflake inside the jar (and also doubles as a handy ornament hanger later on).
3. (Please see safety notes at the bottom of the post before starting this step.) Fill your jars with boiling water. Add Borax powder and stir. Keep adding Borax until the solution becomes super saturated and you can’t add any more without Borax powder settling on the bottom of the jar. We used about four tablespoons of Borax powder per jar.
4. Add blue food colouring to just one the jars.
5. Loop your snowflakes over pencils (or chopsticks), to balance on top of the jars. Add a white snowflake to the jar with the blue food colouring, and the other snowflakes to the remaining jars. You can also add paper covers if you wish, by cutting out a circle slightly larger than the jar diameter, and cutting a radial line for the thread to pass through.
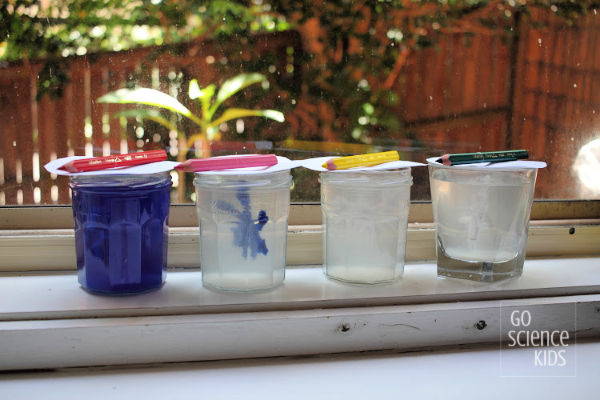
6. Leave for 24 hours (or longer). The solution will be cloudy at first, but will start to clear after about an hour. You can start to see small crystals forming, and they’ll continue to grow for the next couple of days.
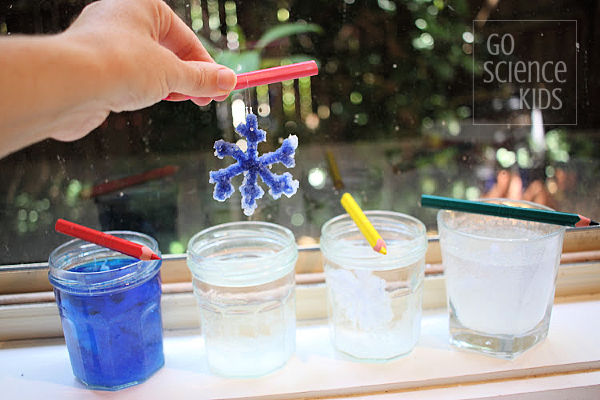
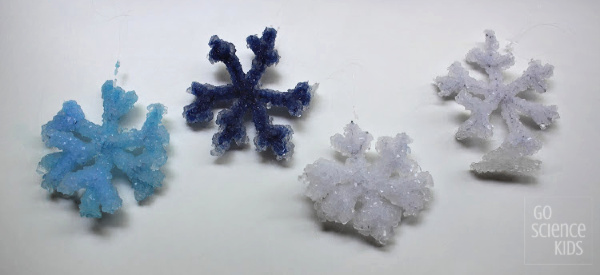
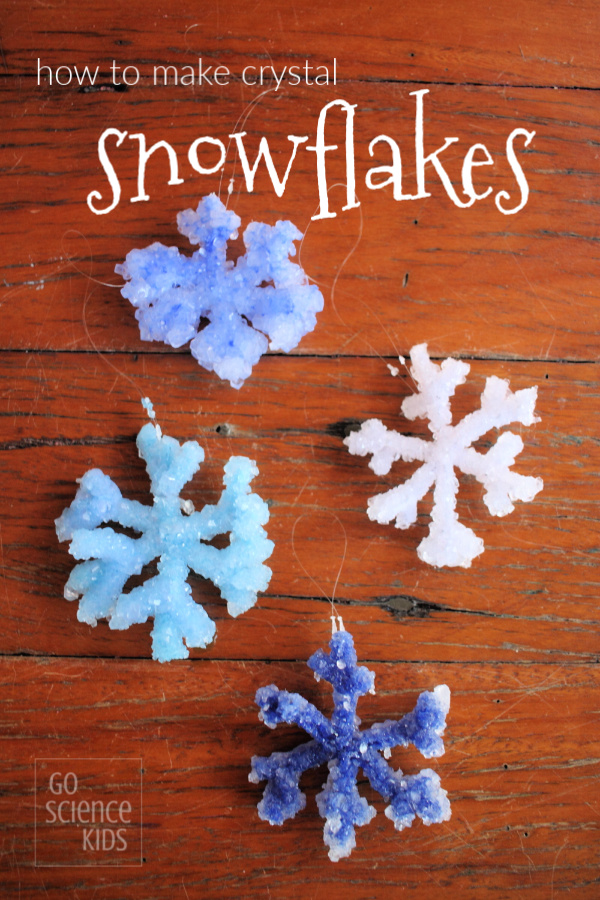
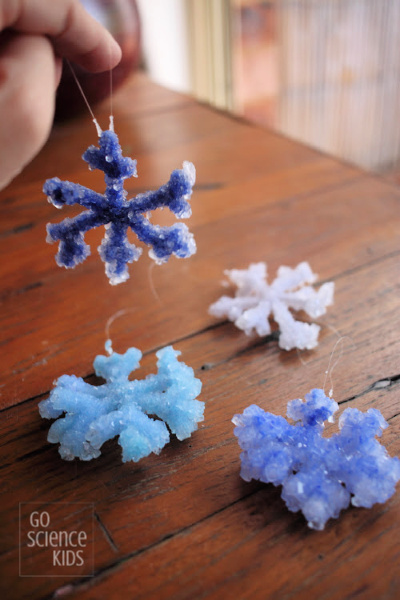
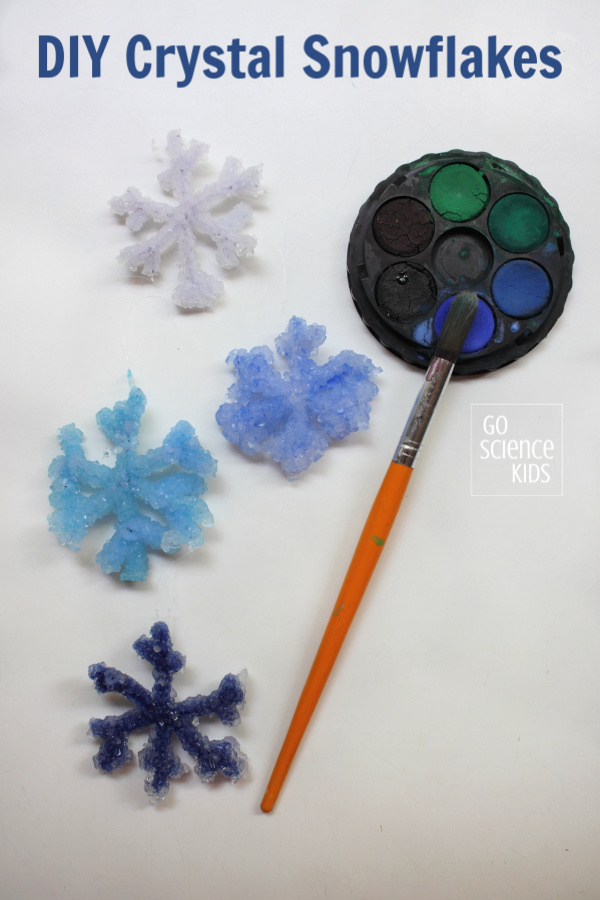
7. Remove the snowflakes from the solutions. You should now have a blue crystal snowflake (the food colouring one), a second blue crystal snowflake (the blue pipe cleaner one), and two white snowflakes.

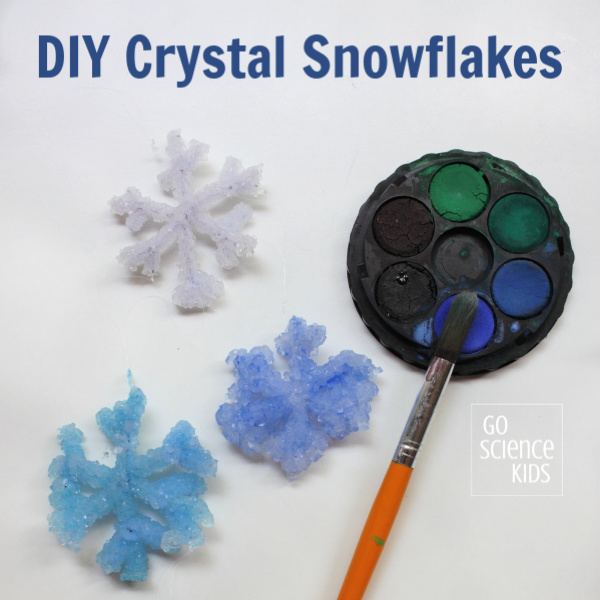
8. Here’s where we tried out the special new technique! Use watercolour paints to paint one of the white crystal snowflakes blue, and watch how the crystals absorb the colour towards the centre of the structure – it’s fascinating! (Thanks Happy Hooligans for the inspiration!)
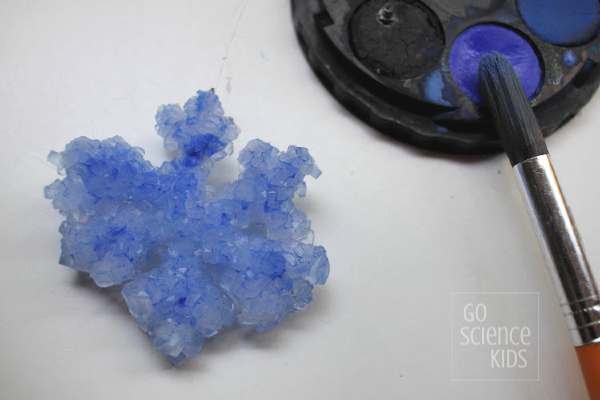
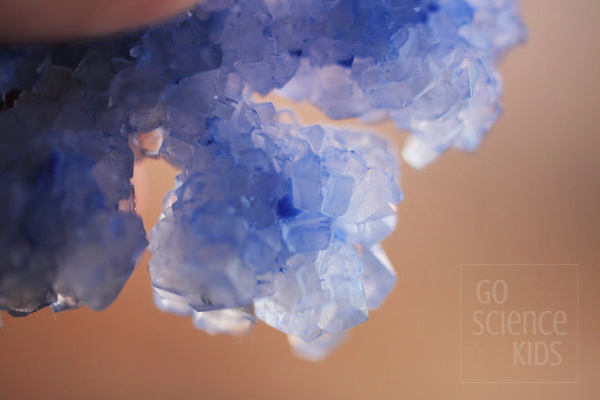
Below is a pic of the watercolour painted crystal after it’s had a chance to dry. Can you see how the large outer crystals have remained largely transparent, and that the blue colour has snuck in through the little crevasses, in towards the pipecleaner at the centre of the crystal structure? This is a great way to demonstrate how moisture can seep though rocks. SO AWESOME!
I’m so excited about this new technique – we’re definitely going to try this again!
But, ahem, getting back to our original question – what’s the best way to make crystal snowflakes?
Let’s compare.
Below is how they all look being held up to the window. (Top left = watercolour, top right = food colouring, bottom left = blue pipe cleaner, and bottom right = control / plain white.
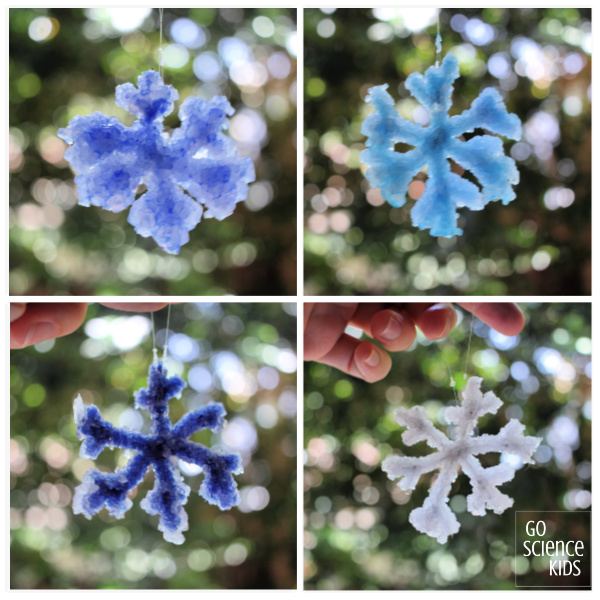
And here’s how they look outside in the sun. (The water colour one is the bottom right, and the food colouring one is bottom left.) I love how they all sparkle in the light!
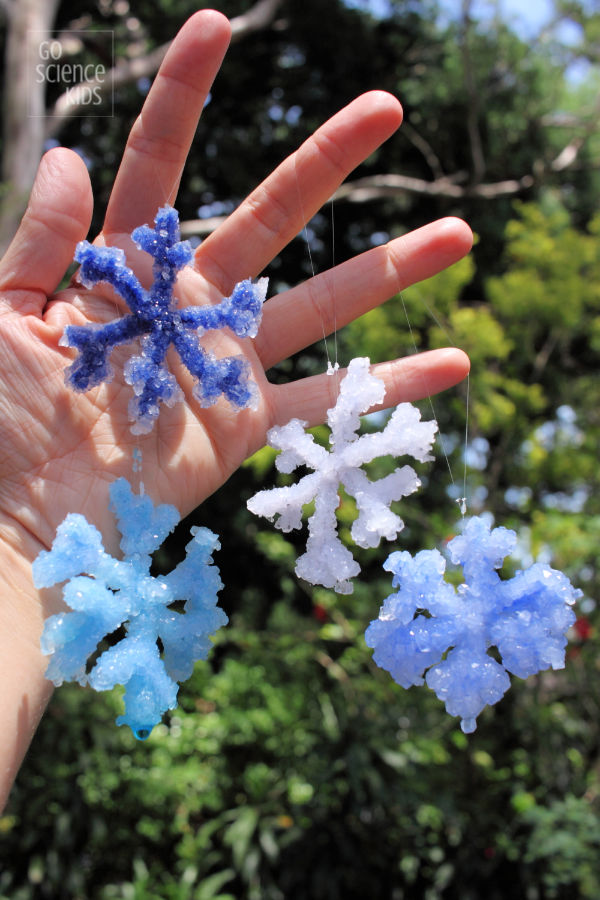

And here’s how they look on the coffee table inside. (You can tell the watercolour one by now right? It is at the top.)

The verdict?
For me, the watercolour snowflake wins, hands down. Not only are you able to choose the colour that you want more easily (as you can choose from the whole watercolour pallet), but the way the paint is absorbed through the crystal structure is both fascinating AND beautiful!
Fun Science
Borax (also known as sodium borate, sodium tetraborate or disodium tetraborate) is a naturally occurring mineral and salt, that is mined from seasonal lakes. Borax has numerous industrial uses. It is often dissolved in water to form an alkaline antiseptic solution that is used as a disinfectant, detergent, and water softener (which is why you can often find it in the laundry aisle. Or you can also find it online).
When you stir Borax into very hot water, you can see that the water becomes very cloudy. This is because the Borax molecules become suspended in the water. As the water cools to room temperature, the solution becomes super saturated, and Borax separates from the water molecules and attaches to whatever it can, including the sides of the jar, and the pipe cleaner decoration dangling inside, forming beautiful translucent crystals.
Borax crystals are generally well formed and quite large, although you won’t typically find them in jewellery or in museum displays. This is because the crystals won’t hold their structure over long periods of time, like other crystals would. Because they are a salt, they go through a process called efflorescence. Dehydration causes the translucent crystals to become opaque, and eventually crumble into a white powder. (This is just starting to happen to the Borax crystal flowers we made almost 2 years ago, with a dusting of powdern just starting to appearing on the surface of the crystals).
Making crystal snowflakes would be a great winter science project, but as it happens, we made ours just before Christmas, and Christmas falls in summer-time in Australia! Snowflakes in summer? Ha! I guess somehow Christmas and snow are intrinsically linked, even for us down-under! (If you are interested, you can find more Christmas science projects here.)
Homemade crystal ornaments do look amazing hanging on your Christmas tree. (I have some pics of them on the tree, but they’re still on my camera. I’ll add them when I get a chance!)
We went a bit crystal crazy this year – it seems we’ve amassed quite a DIY Christmas crystal decorations collection! (And this pic below doesn’t even include the crystal candy canes that we made last year!)
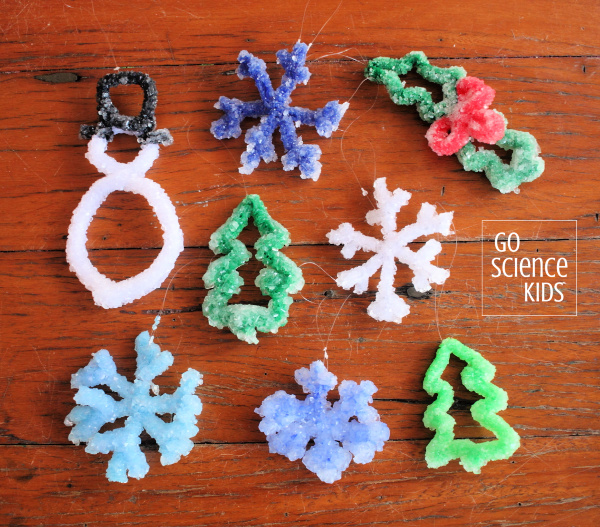

You can see all our crystal activities on Crystal Science page. Yes, we are officially crystal-obsessed. 🙂
While we are on the topic, just a quick note about storage. Because Borax is a salt, the crystals will eventually dehydrate, and start to crumble back into a white (or perhaps blue!) powder. This is a slow process – but it is starting to happen to some crystals we made about 2 years ago, and I’d like our Christmas crystals to last longer than that! So, in an attempt to slow down this process, I’m trialing storing our crystal Christmas ornaments in a zip lock bag between seasons to prevent moisture loss. I’ll let you know how they go!
Safety notes…
Be careful with boiling water around young kids. Place the glass jars down on a table before adding boiling water – glass with boiling water inside will quickly become too hot to hold.
Borax is a commonly used natural ingredient in grade school science experiments, and is safe for older kids to handle when used responsibly. It is not edible however, and will irritate if put directly into eyes. It is also a mild skin irritant for people with sensitive skin. Treat it like you would handing laundry powder. I recommend wearing safety glasses, using spoons, and washing hands afterwards.
With Borax being inedible, please be mindful of who might be able to reach your crystals afterwards. Make sure that your crystal creations are stored out of possible reach of babies, toddlers or pets. We hang ours up high on our Christmas tree, and store them in zip lock bags in our Christmas box in the garage for the rest of the year.
All kids’ activities on this blog require attentive adult supervision. Parents and carers will need to judge whether a particular activity is appropriate their child’s age and skill level. Click here for more information.
You might also be interested in our Go Science Kids and Crystal Science boards on Pinterest.
And, of course, you can always subscribe to our newsletter, to receive all our latest activities straight in your Inbox. We’d love to have you join us!
* This post contains affiliate link(s) to similar products used. An affiliate link means I may earn a referral fee or commission if you make a purchase through my link, without any extra cost to you. Thank you for your support.